Automatic Levelling of A Prosthetic Wrist

I’ve been saving this one up for a while… and it’s finally finished! An automatically levelling wrist to help reduce movement compensation in people who use prostheses:

Levelling_Wrist

There are a lot of details about how this device works and what effect it actually has on compensatory movements in my M.Sc. thesis that I don’t have the space to include here. For those of you not looking to casually browse a 105-page technical document, I’ll give you the quick run-down:

Motivation

Anyone who doesn’t have a fully-functioning wrist is forced to use the rest of their body to compensate for the lack of movement there. For people who’ve suffered from an upper-limb amputation, this constant compensation can lead to strain injuries in the back, shoulder and neck.

Compensatory_Movements.jpg

Commercially available prosthetic wrists don’t have enough degrees of freedom (and are generally quite difficult to control), making it nearly impossible to lift something to a high shelf while keeping it level. Allowing the prosthesis to take care of some of the control burden and keep the hand level on its own might be able to get rid of some of these compensatory movements.

How the Levelling Works

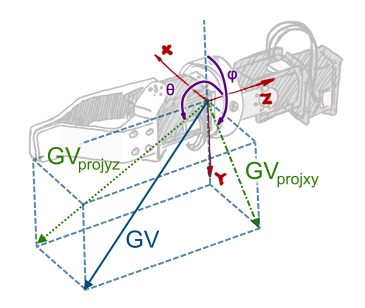
The secret ingredient is the addition of an inertial measurement unit (IMU) in the base of the hand. This sensor can tell which direction gravity is pointing, and gets the angles φ and θ. The control computer then uses two separate control loops: one that keeps the rotation angle φ =180°, and another that keeps θ to whatever angle the user sets.

Angle_Finding_Diagram.jpg

Does It Help Reduce Compensation?

We did a study with 12 able-bodied people wearing a simulated prosthesis in a motion-capture environment, testing on two well-documented clinically-relevant tasks. One had a significant vertical component to it, while the other had motions mostly in the horizontal plane.

The brief summary is that we found that an automatically levelling wrist may reduce compensatory movements in shoulder flexion for vertically-oriented tasks, but doesn’t provide a statistically significant benefit on horizontally oriented tasks. Through performance metrics and user satisfaction surveys, we also determined that the reliability of an automatically levelling wrist is a major design criterion to consider for future research in this area.

To A Finished Thesis!v2

Robot from Household Trash

A few months ago, the New Trail magazine contacted me with an interesting request: They wanted me to design and build a robot out of household trash. At the time, I was right in the middle of writing my thesis, so of course, I jumped at the opportunity for something else to work on.

In order to be able to call the thing a robot, I figured it needed to take in some information about its environment, and change its behaviour based on that input. Making this thing out of household trash and salvaged components meant that I would have to keep it simple… but as with most of my projects, my ideas tend to run away with themselves.
NTD-02-19-Robot-Run-250x250

This little guy has bump sensors on either side made from popsicle sticks and carefully placed tin-foil electrical contacts that allow it to switch directions and run the other way whenever it runs into something. The tin-can body turns around based on the same input, using the mechanical linkage to spin a central pencil axis.

The New Trail has issued a challenge to anyone who wants to try building one of their own, and they’ve put together a nice assembly manual for the project as well. If you do end up attempting a build, I will make one suggestion: have lots of glue on hand. The article isn’t joking when it says I used a lot of glue.

Photo and video courtesy of New Trail Magazine.

Custom Harmonica Watch

If you could have a custom-built watch with any gadgets and gizmos built into it that you could want, what would you include?

Harmonica Watch Finished

When I first had the idea to integrate a tiny harmonica into a wristwatch, I started asking myself this very question. My mind ran the gamut of potentially useful items, creating a list of things including a compass, bits of string, LED flashlights… you name it. Being constrained to some degree by the size of my intended watch, I ended up selecting a few components that I thought might be the most useful to me: a chronometer (of course), a USB memory stick, and a harmonica.

The Chronometer

No wristwatch would be properly complete without a means of telling the time, so this was the first consideration. Without having any of the skill, tools, or means of building my own timepiece, I went for the next best thing: I bought and disassembled a cheap watch from Walmart and appropriated the functional components into the body of the watch I designed and built.

The Harmonica

This was the second consideration. As the spark of the idea that created this project in the first place, the harmonica was certain to earn a spot in the final design. It’s a vintage Hohner Little Lady from some unidentified era (presumably from before they started calling them Little Ladies since there is no etching on it anywhere to indicate that name). This is the same tiny harmonica design that earned the honor of being the first musical instrument played in space, in 1965.

The USB Memory Stick

While these memory sticks are growing somewhat out-of-fashion with the ubiquity of cloud-based storage, I still find them personally useful in a number of situations. And that of course, is the beauty of designing and building your own custom tech. You’re not limited by what the vast majority of consumers might find useful, or by what will be easy to sell. You just get exactly what you want. I pulled this little 2 GB memory stick out of a rubber Speedy Gonzales that I believe originally came from Staples.

Design and Build

The watch is designed to be built from four layers of woComplete-Assemblyod, that when glued and screwed together create the cutouts necessary for all the pieces to fit in properly. Both the harmonica and USB stick are held in place using friction fits, which actually turned out remarkably well given my limited experience with woodworking projects. If you’re planning on making your own watch or something similar, I recommend cutting your pieces very slightly larger than required and sanding down, testing the fits as you go until you’re satisfied.

The drawings for all of the wood parts and for the assembly of all the pieces can be found here: Casing Drawings.

It has been quite a fun project, and to be honest I wasn’t sure at any point during the process that I had the skill or ability to be able to pull something like this off. There are a few things that I might change in a re-design if I ever come back to it, and a few things that didn’t turn out quite as I’d hoped (notably two screws in the back shearing off meaning I can no longer change the battery without drilling them out), but overall I’m pleased with the final product. I guess it just goes to show that just because you don’t think you can do something doesn’t mean you can’t try. You may surprise yourself… I did.